

Original author
Resource type
Content area
Use type
Tools
Tags
What does a pinball bouncing off of bumpers have in common with a bee using landmarks to navigate back home from a flower patch? Both of these examples are instances of individuals reacting to other objects in their environment. When bees fly back to the hive they depend on landmarks in the environment to reach their destination. A bee might remember to turn left at the large oak tree and fly straight until reaching the creek, where one last right turn will bring her to the hive. Any change in the spatial arrangement of the landmarks can be devastating for the bees. If someone cuts down the large oak tree, then the bees will be unable to react to that landmark and may never reach the hive. Just as the arrangement of the landmarks is important for the bees, the location of the bumpers influences the pinball’s path. In both examples, the spatial arrangement of the obstacles affects the behavior of the individuals. Unlike many other modeling tools, StarLogo enables you to create a system with a spatially meaningful environment in which you can see how the individuals that you create react to their surroundings.
Running the activity
- Have the students open a new StarLogo TNG file and save it as “Bumper_turtles”. Show them how save next version saves a new file with a number appended to the end.
- Tell students that they are going to build a model in which turtles react to obstacles in their environment and that this interaction is based on a set of simple rules that tells the turtles to check the color of the patch one step ahead of them and turn different directions based on that color.
- Start out as you did in Painted turtles creating turtles in a setup block. Instead of using a clear-all that would erase the patches, add a clear everyone block.
- Next set up the run loop using a forever block. Here, instead of just wiggling (turning some random angle and moving forward) you need to instruct the turtles to do different things based on what color is in front of them.
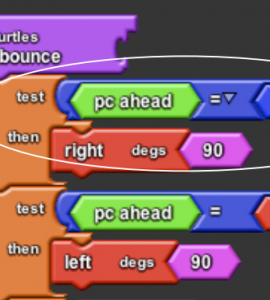
- Review the directions we used in the Pixelated paths activity: [If you see a black square in front of you, then turn all the way around (180°); if you see a blue square in front of you, then turn left (90°)if you see a red square in front of you, then turn right (90°)]
- Show the If/Then block and talk about how it works… If the “If” part is true then carry out the “Then” part. If the “If” part is false don’t do the “Then” part and just move on to the next instruction.
- Show the pc-ahead block and discuss what it means (it returns the color of the block ahead of the turtle)
- Show how the pc-ahead block is used in an expression. For instance (pc-block = blue) returns a “Boolean”, an answer of either “true” or “false”.
- Now show how the expression fits into a conditional block. If (pc-ahead = blue) then turn left 90 degrees and put it together
- Ask “What should the turtle do if it doesn’t see one of these colors directly in front of it?” Hopefully one of the students will realize that they should just move forward a step.
- Explain that the If/Then statements can be linked one after the other to make the compound If/Then we need.
- Have the students construct the rest of the “control structure” on their own and save the file. [Note: they cannot test the code yet because there are no colored blocks in their Spaceland].
- Next show the students how to create colored patches in Spaceland using the terrain editor. Be sure to make pure red, blue, and black (see RGB chart in cookbook if you need help) so the turtles will react to the colors – explain turtles will only “see” the color if the number is exactly right.
- Save the file again then test the code by hitting setup and forever.
- Ask the students if their code worked as they thought it would. Why or why not? [Note: many different things can go wrong. The student might have drawn a colored block at 0,0 where the turtles started out. The student might have forgotten to add a forward 1 block after the control structure. Etc.]
- Work with students until they all have the control structure in place and working properly. Have students who have completed this part help other students who have not.
- Have students share some of the problems they ran into and how they found a solution. This is an attempt to model “debugging” and walking through the code and the logic and figuring out what the turtles would be doing at each step.
- When everyone has this working do a quick recap. “We have now created interactions between agents and their environment. “
- Next motivate the need for procedures by asking “What if we wanted to give the turtles other behaviors?” As an example, say “what if there was turtle food sprinkled throughout the environment and turtles were supposed to eat food when they ran into it? Where would you put those instructions?”
- Describe how “Instead of sticking all these different behaviors directly into the forever loop we might want to break the behaviors into different groups.“ The control structure we made could be put in its own separate container or “procedure” called “bounce” and the eating behavior could be put in its own separate container called “eat”. Then in the forever block or run loop all we would have to do is tell the turtles to “bounce” then “eat” and the computer would know what bounce and eat meant. Explain that this is called “decomposition” – it means breaking down a big task into many smaller tasks.
- Show how to make a new procedure called “bounce” and where to put it (in the turtle column.) Then show how the entire control structure can be dragged into the new procedure.
- Finally, show how the forever loop now is empty and needs to “call” the bounce procedure. Test this.
Concluding the activity:
Wrap up the activity by reviewing terms and concepts.
Log in or register to view attachments and related links, and/or join the discussion